Page Contents
MAPP XT User Reference
This information is intended to identify the differences between MAPP 3D and XT, making your first uses of MAPP 3D more efficient and productive, less frustrating.
General Differences
No Internet connection is needed to predict results. MAPP 3D is ‘offline,’ meaning there is no client/server connection utilized for prediction.
The loudspeaker and rigging data is not included in the application installation file. Open HELP > CHECK FOR UPDATES, select Rigging and the desired loudspeaker models for download. This prevents having to install a new version of the application when a new loudspeaker model is available.
MAPP 3D will need to validate the application authorization once every 30 days while the host computer is connected to the Internet.
An Import MAPP XT project function will be added soon.
MAPP 3D projects are saved with the file extension: .mapp
Application Operations
- double-click tabs to un-dock, double-click window header to re-dock
- when entering values or coordinates, select value (click), and type new value or press up/down keyboard arrows
- when naming objects and layers, use a capitalization scheme to easily identify object types, e.g., LOUDSPEAKERS, Geometry, microphones
Model View
In the Model View tab, right-click to open contextual or pop-up menu.
- pan model: hold SHIFT, click-hold, and move mouse
- orbit model: hold SPACE, click-hold, and move mouse
- zoom with mouse wheel or Tools
- zoom to Extents, use this Tool button:

Venue Drawing
- see BUILD > NAVIGATION in the site menu above regarding the Coordinate System used in the 3D model space
- see BUILD > ADD PRIMITIVES and > QUICK DRAW VENUE in the site menu above for information about drawing venues
- edit the properties of geometry in the Properties tab or Object Settings tab
When adding Primitives, select a non-isometric or “flat” view (Top, Left, Right, Front, or Rear) to add geometry on an axis with a zero value. This is illustrated below:
To Add Primitive Flat on an Axis, Add Primitive in Flat Viewport
Predictions in Model View
Instead of visualizing sound pressure in air, Primitives are added and selected for prediction. These Prediction Planes can be offset from the geometry to represent ear-height.
The pressure plot colors can represent SPL (new) or Attenuation (like MAPP XT); select via the FILE > PROJECT SETTINGS > SPL tab. In SPL mode: the values are average SPL (not peak) and are only for the selected frequency range, e.g., one octave, 4kHz—see MEASUREMENT VIEW tab, HEADROOM tab for broadband SPL.
If the prediction results are plotted as mostly white or mostly black, adjust the SPL Maximum Value or Minimum Range (FILE > PROJECT SETTINGS > SPL tab).
If an object can not be selected or edited, ensure its layer is unlocked.
To visualize sound in air (like MAPP XT), add geometry parallel to the Z-axis, on-axis to a loudspeaker or array.
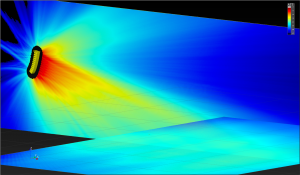
Model View – Vertical Prediction Plane
Layers
- Layers are managed in the TOOLS > LAYER MANAGEMENT window.
- Use a capitalization scheme to easily identify layers that have different object types, e.g., LOUDSPEAKERS, Geometry, microphones.
Processors
- Use INSERT > SIGNAL PROCESSOR to add processors. Processors are edited and managed in the PROCESSOR SETTINGS tab.
Editing
- Use the Express Settings tab to edit common properties for geometry, loudspeakers, processors, and microphones.
- Use the Properties tab to edit common properties for geometry.
Import
- DXF and SKP (SketchUp) formats—one of each format can be imported into a project (FILE > IMPORT).
- Both file types import with layers accessible for show/hide and locking, see BUILD > IMPORT DRAWINGS in the site menu above.
Special
- LMBC settings are accessed in PROCESSOR SETTINGS tab, LOW-MID BEAM CONTROL tab.
- The Auto-Splay tool is accessed in TOOLS > AUTO-SPLAY.
- Connect to Galileo GALAXY processors via TOOLS > SIGNAL PROCESSOR MANAGEMENT; push or pull processor settings when connecting.
Reference Material
Keyboard Shortcuts (also under MORE menu at top of this page)
Searchable FAQ (link at top of this page)
What’s Next?
Please see Start Project next.